Here is how I made them:
what you need to do is poke a hole in the top and bottom of the egg and blow out the inside of the egg. I made one side bigger and cooked the blown out egg as scrambled eggs. Be very careful for you can break the egg or get egg shells in your blown out inside goodness. Next I used very hot water from the kitchen facet and ran it through the egg shaking the egg in an attempt to clean it as much as possible. It will take days to completely dry and it needs to be completely dry. Be Patient.
Take a paper plate and cover it with freezer paper. I taped the back to keep the paper on the paper plate. I used paper plates because in the end it was a lot easier just to throw the covered paper plate away than take off the freezer paper from a regular plate.
Cut up your fabric into small pieces. The pieces do need to be very small but this whole project works better when the fabric is of various shapes. I just went a little crazy and snipped and snipped. I divided my fabric into bowls with different color schemes. Trust me this will make your day go a lot better when you start using the glue things get a little messy and you do not want to be trying to sort through a lot of small pieces of fabric for one color mixed into a large batch of fabric pieces.
Now we glue the fabric onto the egg. There is not right way or wrong way to do this. I overlapped my fabric to cover the whole egg. However it is not necessary to do that. Use regular white ( school glue) it is cheaper and your hand will get all sticky. It is nice to be able to go to the sink and wash up when ever you want. You may find you need to do this often for the fabric piece you keep trying to pick up start sticking to your finger after a while. Now when you cover your egg with fabric place them on the cover paper plates and let them dry for 24 hours. Than I took the glue and just lightly cover the fabric cover egg with a layer of glue. Placed it back on the covered paper plate and let it dry for another 24 hours. This was my way of making sure the fabric was secure.
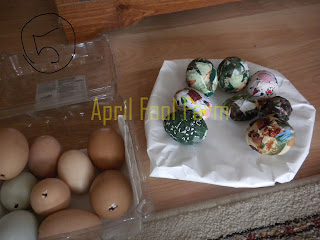
See here the eggs covered with fabric. My stash of prepped eggs ready to be covered with fabric.
I generally make two plate full of eggs. It helps in the next few steps they can be messy.
Remember you have cover your eggs once in a layer of glue now your going to cover them again in a layer of glue this time roll them in some glitter. Choose the glitter you want to compliment the eggs. This is messy but Wow is it fun.:) Let dry for at least 24 hours.
You know those twist ties on bread? Here is a place were we can recycle them. Yea. Take some ribbon and use the bread ties to wrap them into a hanger. Can you see them there on the carpet? This is another reason why I make several at once. Plug in your glue gun and take the tied in and glue it into the larger hole. I do not skimp on the glue gun glue. I apply generously. Can this be a little trying to you. Well the answer is yes. Be careful not to break your egg. ( you can) did you make the ribbon small enough to go in the hole of the egg. The what if's are endless. Try and go with it - don't let it frustrate you this is suppose to be fun.
Here is what you end up with at this stage.
During this step I gather branches from outside and stuffed them into a box. I placed a garbage sack under the make shift tree. This was to prevent the polyurethane from dripping off the eggs onto the carpet. If you do this outside you may or may not need the garbage sack. I did this in winter time so I was definitely not going outside. ( it was far to cold)
I took a foam brush and coated the eggs ( after the glitter had dried) with Polyurethane. I waited 24 hours and did another coat. I did have some eggs drip. I used the foam brush to dap the bottom of the eggs to prevent a weird look. Also I wore gloves during this step. It will be messy, go slow. The good news this is the final step.
Ta Da Ornaments for any occasion.
Have fun with it.


No comments:
Post a Comment